MCP Server
The Plik CLI includes a built-in Model Context Protocol (MCP) server, allowing AI coding assistants to upload files to Plik directly.
Quick Start
1. Configure Plik CLI
Make sure your ~/.plikrc has a valid server URL:
URL = "https://plik.example.com"If the server supports/requires authentication (feature_authentication: enabled or forced), make sure to authenticate:
plik --login2. Add to Your Editor
Add the following MCP server configuration to your editor:
| Editor | Config file |
|---|---|
| Cursor | .cursor/mcp.json |
| VS Code | .vscode/mcp.json |
| Claude Desktop | claude_desktop_config.json |
| Antigravity | .gemini/antigravity/mcp_config.json |
{
  "servers": {
    "plik": {
      "command": "plik",
      "args": ["--mcp"]
    }
  }
}
To use a separate configuration file, set the PLIKRC environment variable:
{
  "servers": {
    "plik": {
      "command": "plik",
      "args": ["--mcp"],
      "env": {
        "PLIKRC": "/path/to/mcp-plikrc"
      }
    }
  }
}
Available Tools
| Tool | Description |
|---|---|
upload_text | Upload inline text content (code snippets, logs, etc.) as a named file |
upload_file | Upload a single file by absolute path |
upload_files | Upload multiple files by paths in a single upload |
server_info | Get server version, configuration, and capabilities |
list_profiles | List available profiles from ~/.plikrc with their server URLs |
Common Parameters
All upload tools accept these optional parameters:
| Parameter | Type | Description |
|---|---|---|
ttl | int | Time to live in seconds (0 = server default) |
one_shot | bool | Delete file after first download |
removable | bool | Allow anyone to delete the file |
stream | bool | Don't store the file, stream directly to downloader |
extend_ttl | bool | Extend expiration by TTL on each access |
comments | string | Markdown comment to attach to the upload |
login | string | HTTP basic auth username |
password | string | HTTP basic auth password |
token | string | Authentication token (overrides ~/.plikrc token) |
profile | string | Profile name from ~/.plikrc (supports composition: "work,zip") |
NOTE
Some parameters may not be available depending on server configuration. Use server_info to check which features are enabled.
Using Profiles
If you have profiles defined in ~/.plikrc, the MCP server can target different servers per upload:
// Upload to the "work" server
{"tool": "upload_file", "input": {"path": "/tmp/report.pdf", "profile": "work"}}

// Compose profiles: work server + zip archive settings
{"tool": "upload_file", "input": {"path": "/tmp/report.pdf", "profile": "work,zip"}}
Use list_profiles to discover available profiles and their URLs. Omitting profile uses the default server (from startup config or DefaultProfile).
Tool Response
Upload tools return the full upload metadata (as defined by the Plik API) enriched with computed URLs for the upload page and each file's direct download link.
Prompts
| Prompt | Description |
|---|---|
upload_guide | Instructions on how to use the Plik upload tools |
Configuration
The MCP server reuses your existing ~/.plikrc configuration. No additional setup is needed beyond the editor integration.
Configuration is loaded from (in order):
PLIKRCenvironment variable~/.plikrc/etc/plik/plikrc
Example
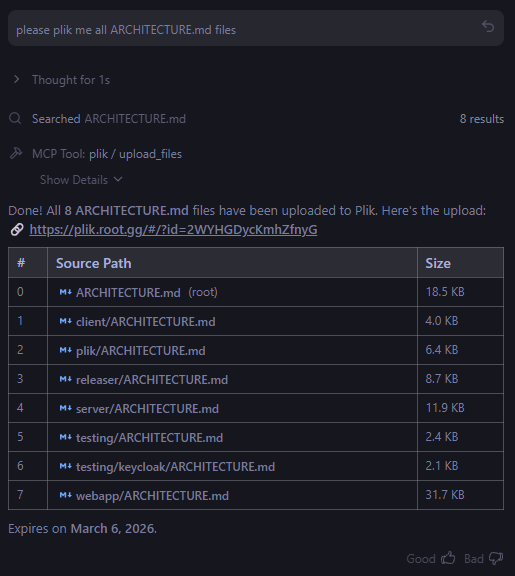
Here is an example of an AI assistant uploading multiple files in a single operation using the upload_files tool:
Troubleshooting
Server won't start: Ensure plik is in your PATH and ~/.plikrc exists with a valid URL.
Authentication errors: Run plik --login to get a fresh token, or verify your token is valid.
Debug mode: Set Debug = true in ~/.plikrc to see request/response details on stderr.